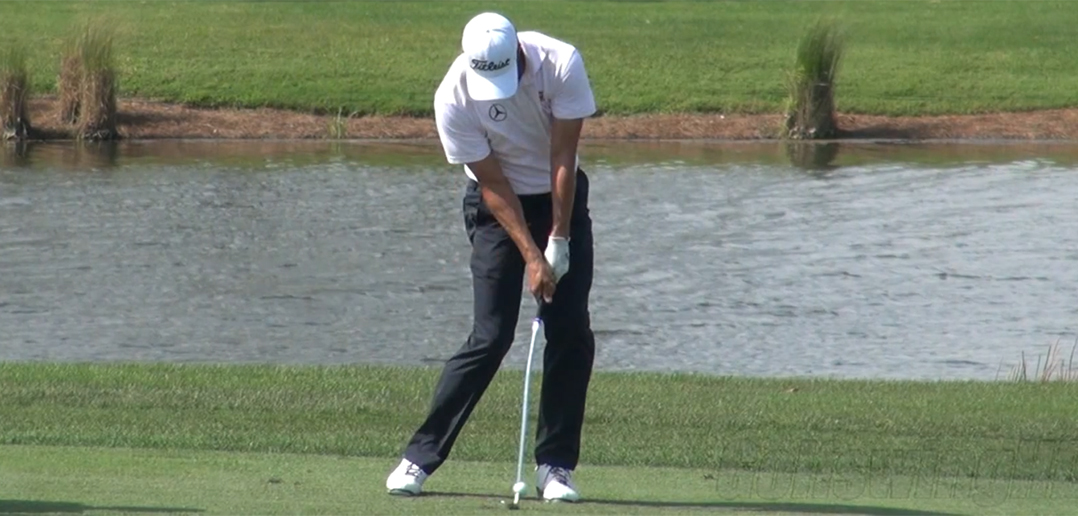
As the club completes the backswing and transitions into the downswing, a critical movement occurs—what I call the “fall” of the clubhead. This subtle but essential motion allows the club to shallow, move to the inside, and approach the ball on an efficient delivery path. When executed correctly, the fall helps the clubface square naturally…
As the club completes the backswing and transitions into the downswing, a critical movement occurs—what I call the “fall” of the clubhead. This subtle but essential motion allows the club to shallow, move to the inside, and approach the ball on an efficient delivery path. When executed correctly, the fall helps the clubface square naturally without manipulation (Model Pro Photo).

What the Fall Looks Like
During the downswing, the clubshaft should not return on the same pitch it held during the backswing. Instead, elite players demonstrate a noticeable flattening of the shaft as the club transitions from the top. This is the “fall.”
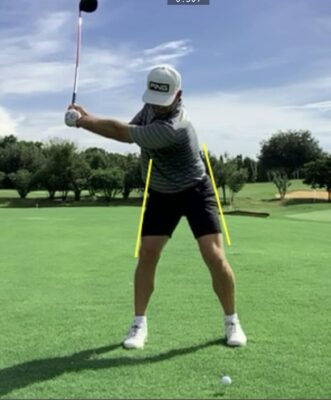
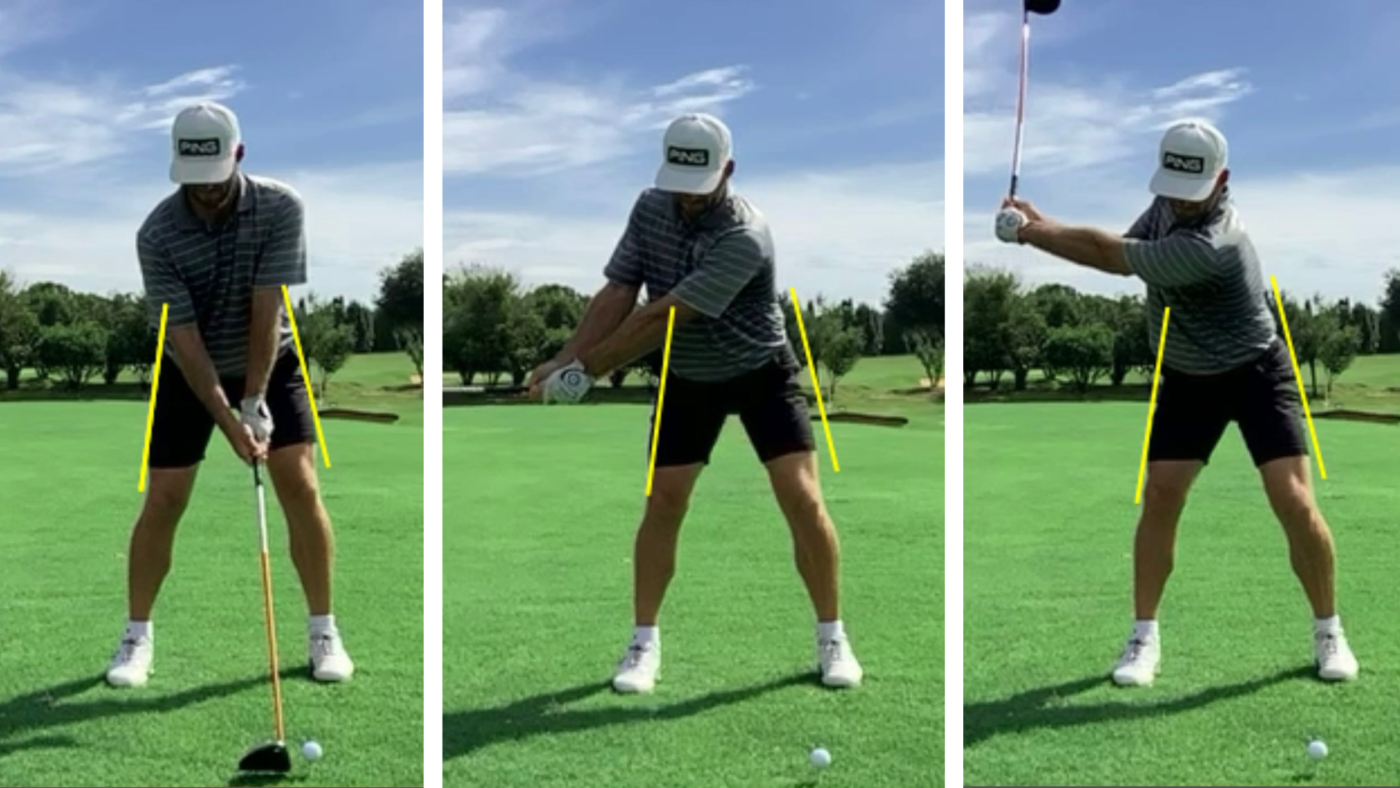
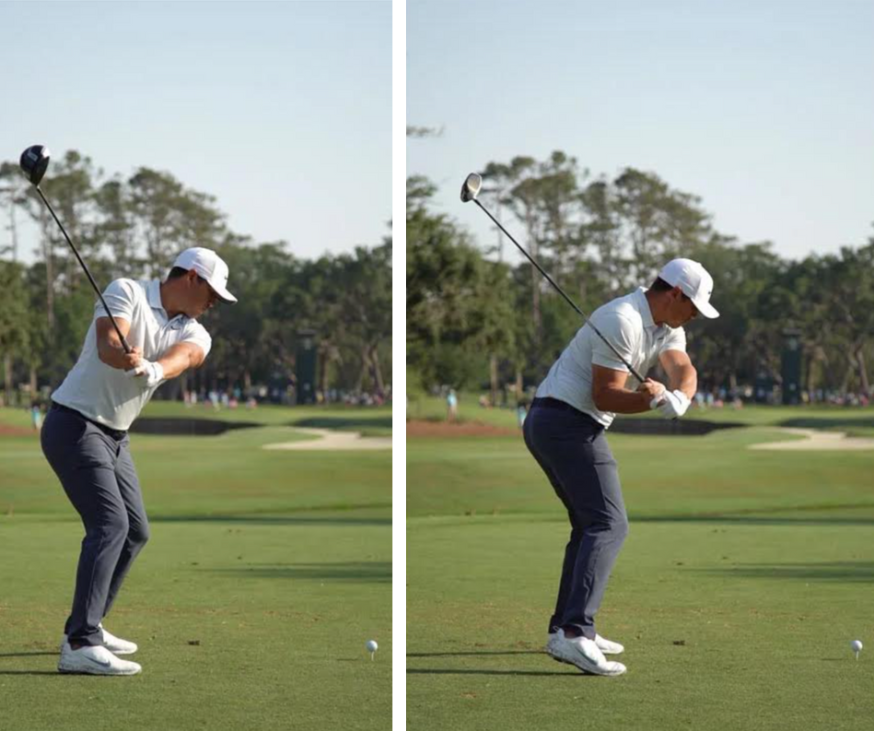
In the Brooks Koepka sequence (P3 to P5), you can clearly see how the shaft shallows as the lower body initiates the downswing. This move is universal among elite ball‑strikers. The fall positions the club on an inside‑to‑out path and allows the face to square through rotation—not by flipping the hands.

Why the Fall Matters
The fall is not a conscious manipulation of the hands or wrists. It is the natural result of:
• A proper lower‑body shift toward the target
• A well‑sequenced trail‑side movement (trail shoulder, arm, and hand)
• A smooth, uninterrupted transition
When these pieces work together, the club automatically shallows and falls behind you—setting up a powerful, repeatable delivery.
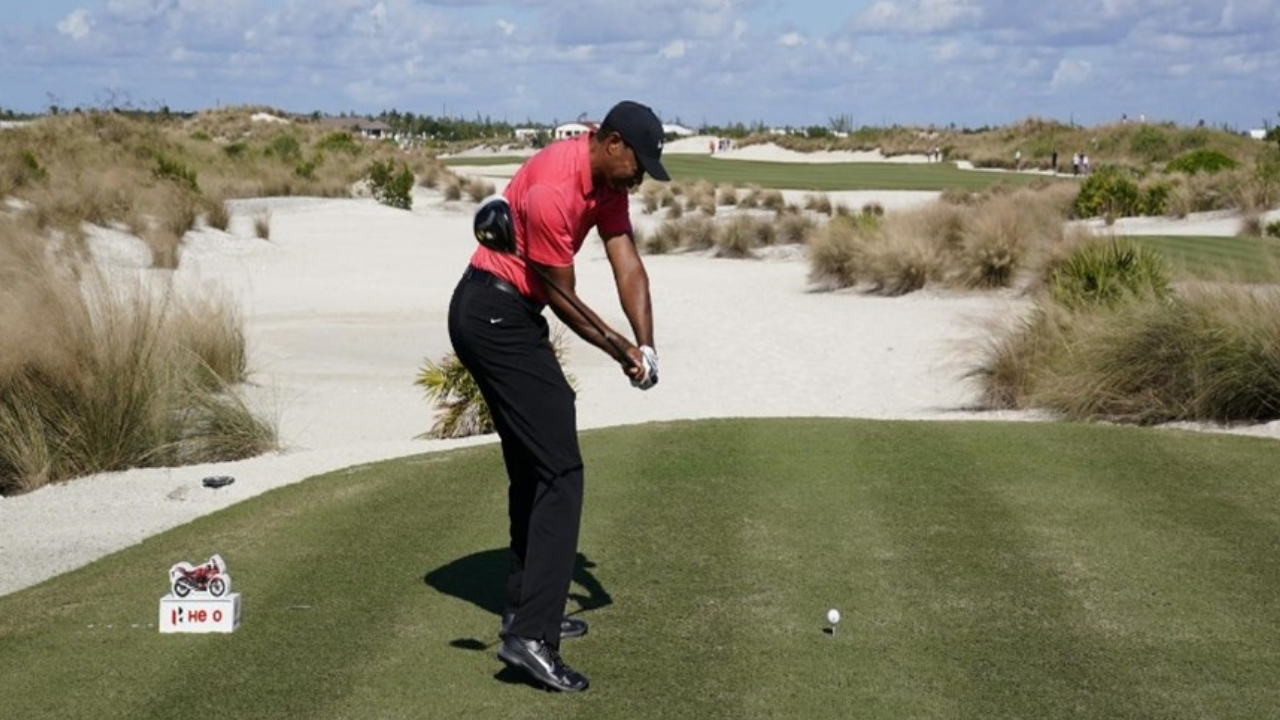
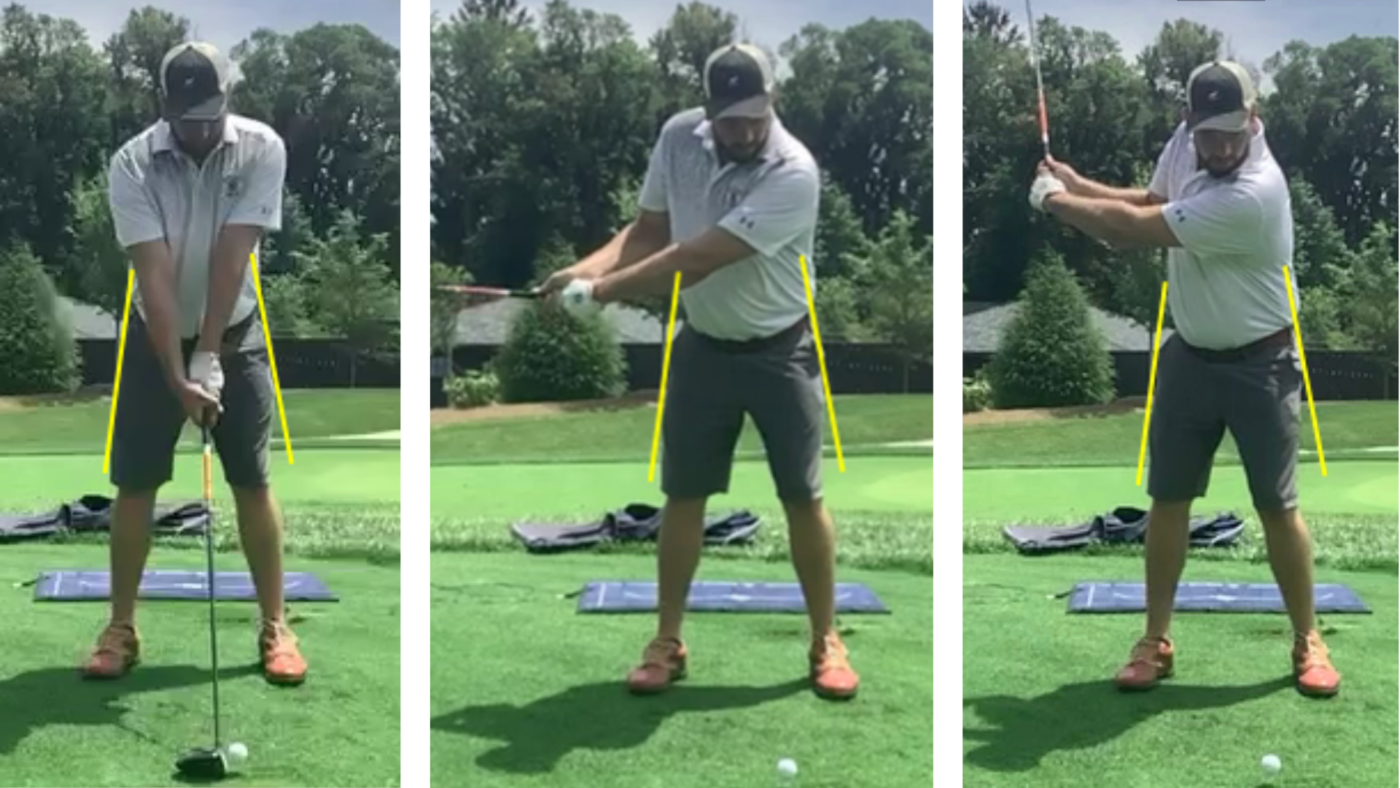
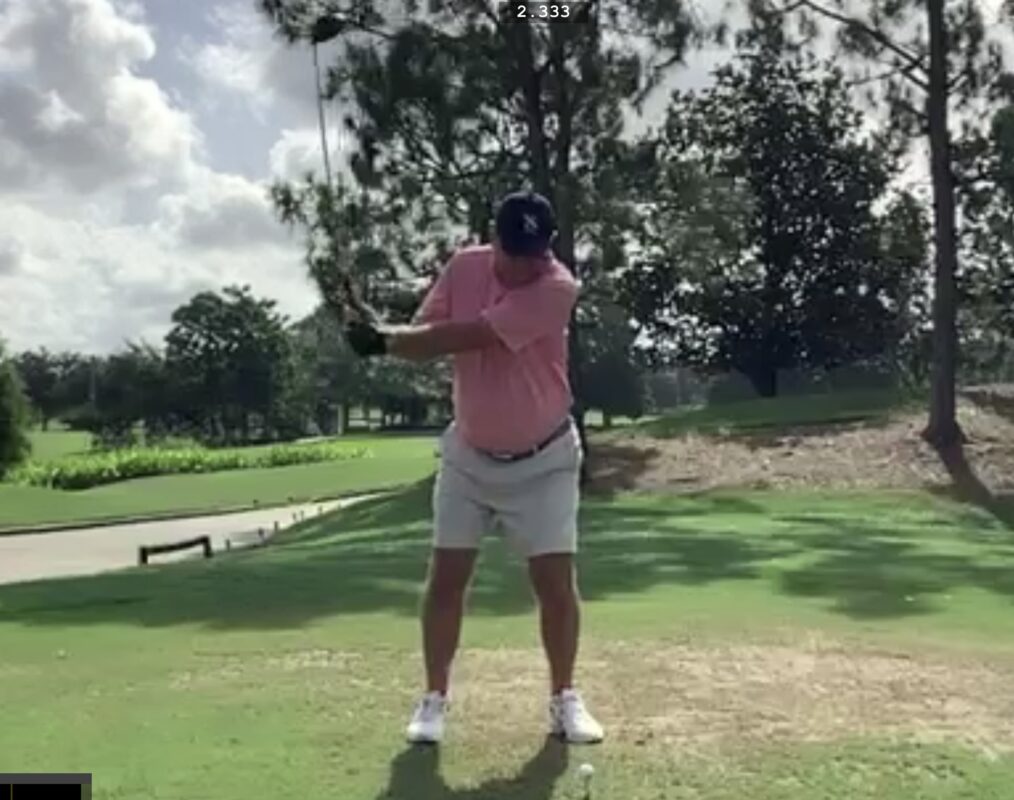
Most average golfers struggle here. Instead of allowing the club to fall, they throw the club over the top with a steep shaft. The result is the dreaded pull‑slice pattern (See Amateur Photos below). Without the fall, the club is forced outside the target line early, and recovery becomes nearly impossible.
Drills to Train the Fall
1. The Tee Drill
This drill provides a simple visual and feel‑based reference for the correct club movement.
Setup: Place a tee in the butt end of the grip.
Steps:
This drill teaches the sequencing and geometry required for the club to fall naturally.
2. Trail‑Side Progression Drill
The trail side plays a major role in transporting the club downward and forward on the correct path. This drill reinforces how the trail shoulder, arm, and hand should move to support the fall.
By training the trail side to work properly, you’ll eliminate the urge to throw the club over the top and instead allow the shaft to shallow automatically.
Final Thoughts
Mastering the fall of the club transforms your ball flight. Instead of fighting a steep, over‑the‑top move that produces inconsistent slices, you’ll develop a natural inside path and a clubface that squares through rotation—not manipulation.
Remember: The clubhead is what strikes the ball. Understanding how it should move at key checkpoints in the swing is essential to building a consistent, repeatable motion.
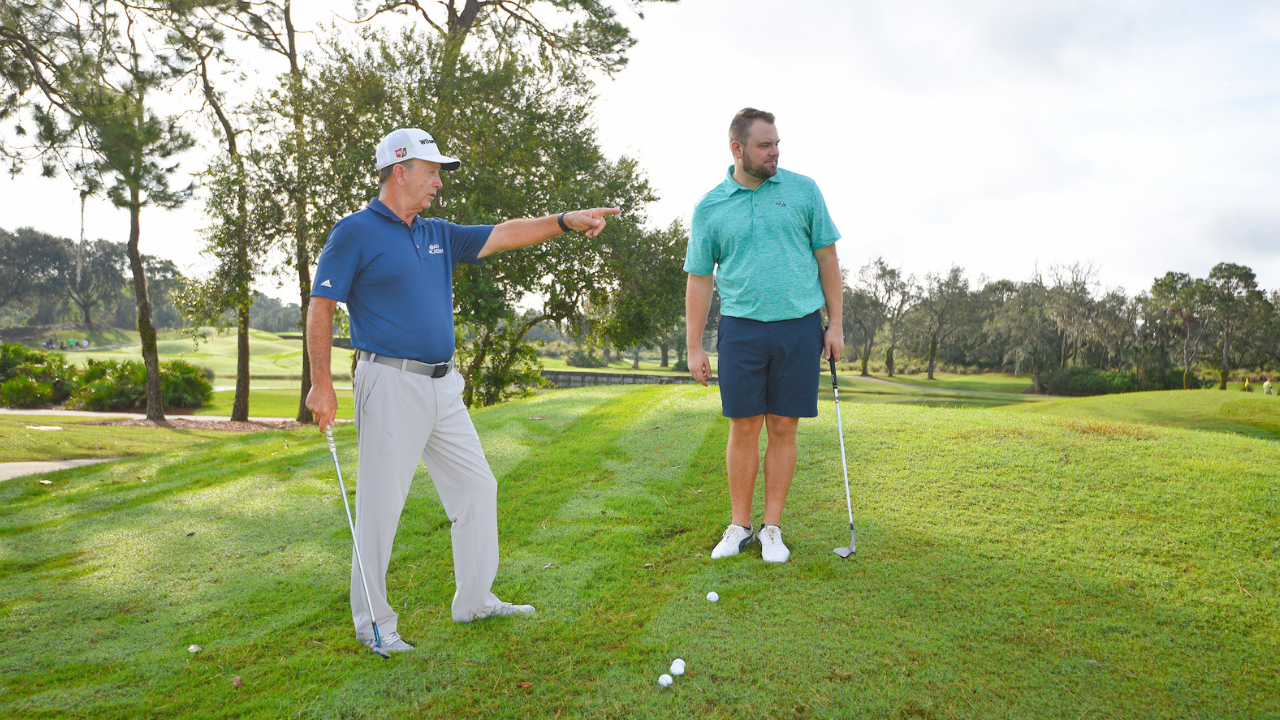
Ready to feel this move in your own swing?
Fred works one-on-one with golfers of all levels to help you train the “fall,” shallow the club, and start striking the ball with confidence and consistency. To book a lesson, contact Fred directly at 407-467-1828 or fred@fredgriffingolf.com and take the next step toward your best golf.

Every golfer dreams of hitting longer drives and more consistent iron shots. The secret isn’t always about swinging harder, it’s about understanding and optimizing one of golf’s most crucial yet overlooked fundamentals: your Angle of Attack (AOA). This single measurement can transform your game, and the best part. It all starts before you even take…
Every golfer dreams of hitting longer drives and more consistent iron shots. The secret isn’t always about swinging harder, it’s about understanding and optimizing one of golf’s most crucial yet overlooked fundamentals: your Angle of Attack (AOA). This single measurement can transform your game, and the best part. It all starts before you even take the club back.
What Exactly Is Angle of Attack?
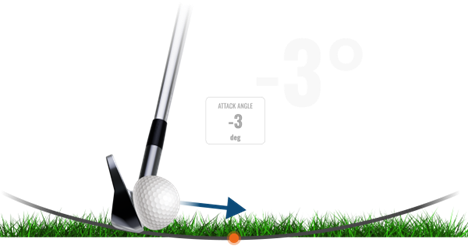
Angle of Attack is the vertical path of your clubhead relative to the ground at impact. Think of it as the steepness or shallowness of your swing’s bottom arc. This measurement plays a crucial role in determining your launch angle, spin rate, trajectory, and overall distance.
A negative angle of attack means your clubhead is moving downward into the ball, creating a steeper impact that generally results in lower launch with increased backspin. This is ideal for irons and wedges, where you want crisp, penetrating ball flight and maximum control.
In contrast, a positive angle of attack means your clubhead is moving upward through impact—creating a shallower, sweeping motion that promotes higher launch with lower spin. This is particularly beneficial for your driver, where reducing spin and increasing launch angle can add significant yardage to your tee shots.
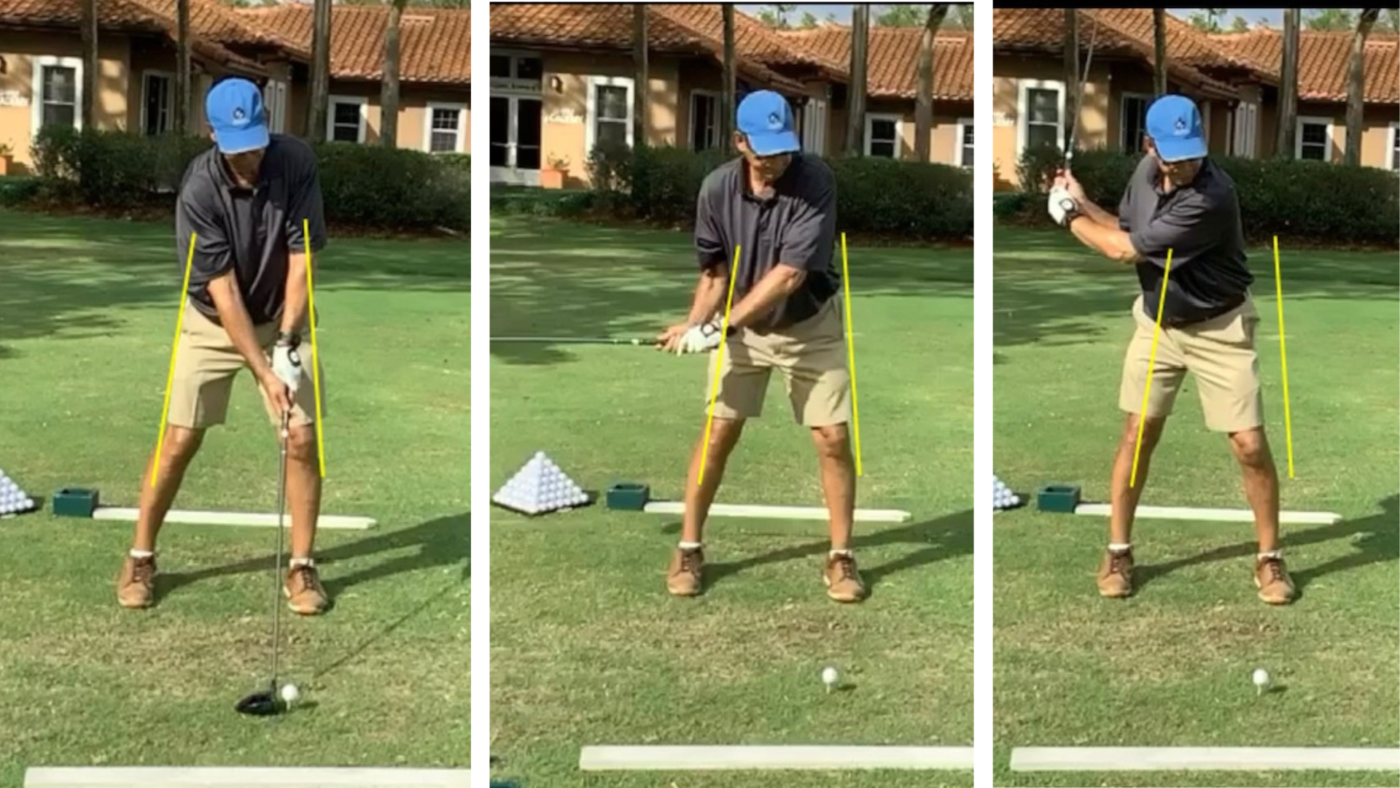
The Four Setup Parameters That Change Everything
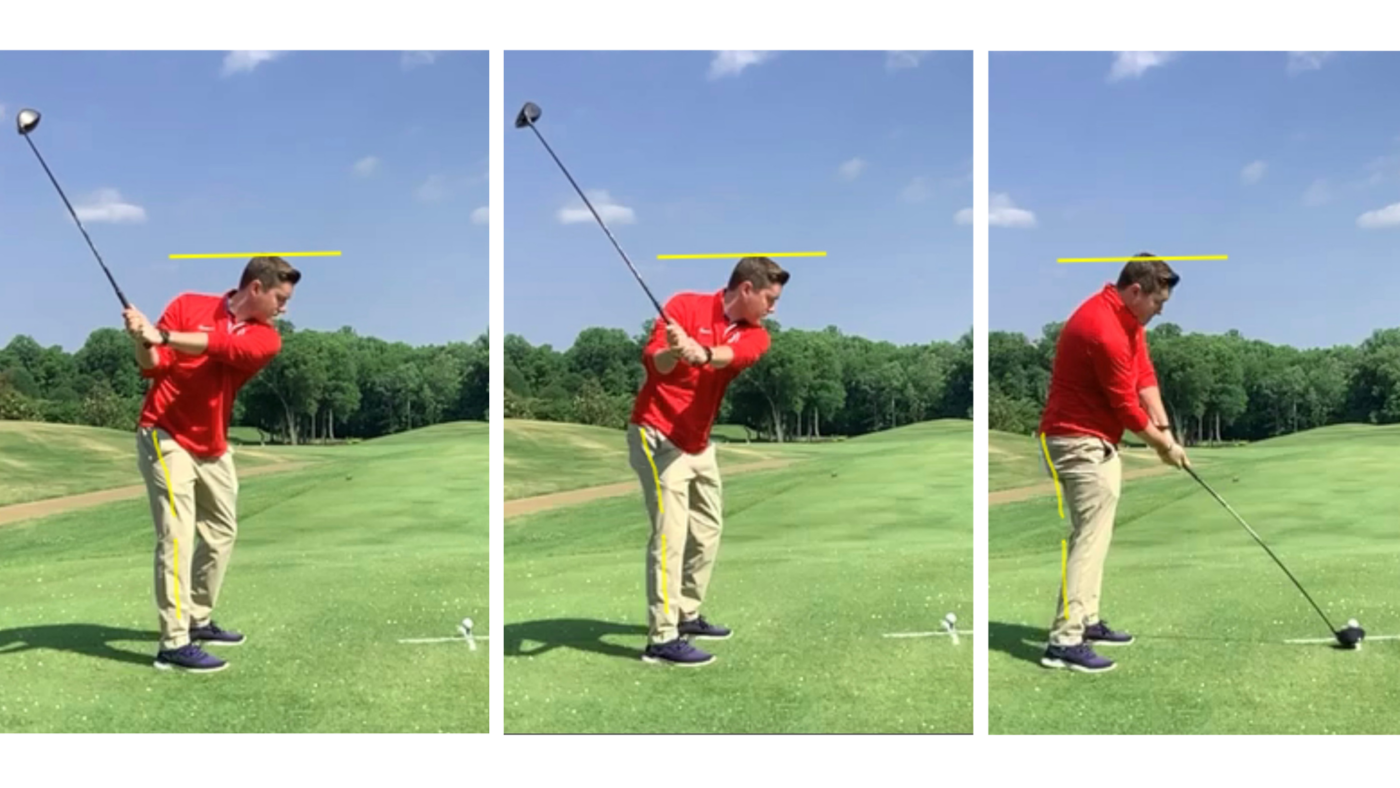
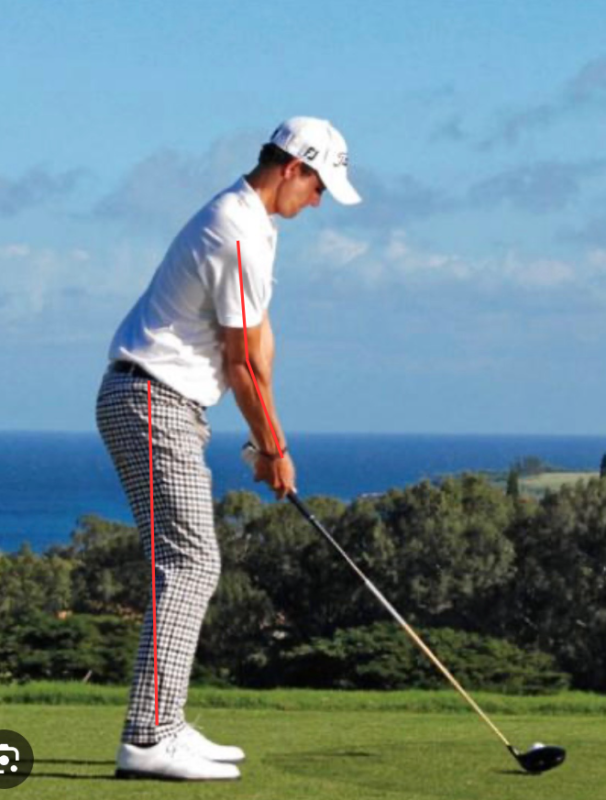
The side-by-side images below illustrate the setup differences that create optimal Angle of Attack for each club. Notice how the PGA Model Pro’s driver setup (left) contrasts sharply with his 9-iron position (right)from ball position and stance width to shaft angle and weight distribution, every element works together to predetermine the ideal swing path. The yellow line is the clubhead’s path during the downswing and the dark line is the path of the follow-through. This demonstrates the shallower driver path compared to the steeper nine iron path. The vertical orange line is the position of the ball relative to the body.

Achieving optimal AOA numbers isn’t about complex swing thoughts during your swing. It’s about establishing the right foundation from the start. Once you begin your swing, instinct takes over—your body will do whatever is necessary to make contact with the ball. That’s precisely why the setup is so critical. These four parameters essentially program your swing path before you even move the club.
1. Ball Position: The Foundation of Your Attack Angle
Driver Setup: Position the ball opposite your lead heel. This forward ball position naturally encourages an upward strike, helping you catch the ball on the ascending part of your swing arc for maximum distance and optimal launch conditions.
Iron Setup (9-iron example): Move the ball back just three inches from your driver position—not dramatically back as many golfers assume. This slight adjustment helps create the downward strike needed for crisp iron contact while maintaining a balanced setup.
The key insight here is subtlety. Many amateur golfers make dramatic ball position changes that throw off their entire setup. The three-inch rule keeps you in the optimal impact zone while allowing for the necessary AOA adjustments.
2. Stance Width: Creating the Right Foundation
Your stance width directly influences your ability to create the proper AOA for each club. The principle is simple: wider for drivers, progressively narrower for irons.
Driver Stance: Slightly wider than shoulder-width apart. This wide base provides stability for the powerful rotation needed in your driver swing and naturally promotes the upward strike you’re seeking.
Iron Stance (9-iron example): Slightly narrower than shoulder-width. This narrower stance makes it easier to shift your weight forward through impact, promoting the downward strike that produces solid iron contact.
Remember to adjust based on your body type. Broader-shouldered golfers will naturally adopt wider stances, while more compact players will use relatively narrower positions.
3. Shaft Angle: The Subtle Game-Changer
The angle of your club shaft at address might seem like a minor detail, but it has a major impact on your AOA.
Driver Shaft Angle: Tilt the shaft very slightly away from the target, positioning your hands just behind the ball. This setup promotes the upward strike that maximizes driver distance and reduces the dreaded pop-up.
Iron Shaft Angle (9-iron example): Tilt the shaft slightly toward the target, positioning your hands just ahead of the ball. This forward shaft lean helps create the descending blow that produces crisp iron contact and optimal trajectory.
These shaft angle adjustments work in harmony with your ball position to create the ideal impact conditions for each club.
4. Weight Distribution: The Dynamic Element
How you distribute your weight at address sets the stage for proper weight transfer and optimal AOA throughout your swing.
Driver Weight Distribution: Balance your weight evenly between both feet. This neutral position allows for the full body rotation and weight transfer that creates power while maintaining the upward strike angle.
Iron Weight Distribution (9-iron example): Shift slightly more weight to your lead foot (about 60-40 distribution). This forward weight bias makes it easier to maintain the descending strike through impact while still allowing for proper weight transfer.
Understanding the Swing Path Visualization
When you observe high-level players, you’ll notice distinct differences in their swing paths between drivers and irons. The clubhead path with a driver appears much shallower through the impact zone. With irons, the path is noticeably steeper, creating that “ball-first, turf-second” contact that produces consistent distance and trajectory control. The ball position relative to your body acts as the timing mechanism for these different attack angles. With the driver, the forward ball position means you’re catching the ball as your swing arc begins to ascend. With irons, the ball moves slightly back, catching the ball just before the bottom of your swing arc, creating the downward strike.
Click here to view a YouTube video demonstrating the 4 Keys for optimizing AOA
Cause and Effect: Why Setup Determines Success
In golf, understanding cause and effect relationships is crucial for improvement. Your setup positions create a chain reaction that influences every aspect of your swing. When you establish the proper ball position, stance width, shaft angle, and weight distribution for each club, you’re essentially programming your swing for success before it even begins.
Many golfers struggle because they try to manufacture different attack angles through swing manipulation during the motion. This approach is inconsistent and often leads to timing issues. By contrast, when your setup naturally promotes the correct AOA, your swing becomes more intuitive and repeatable.
The Distance and Consistency Connection
Optimizing your Angle of Attack through these four setup parameters offers multiple benefits:
With Your Driver: A positive AOA can add 10-20 yards to your drives by reducing spin and increasing launch angle. You’ll also see more consistent ball striking and fewer mishits.
With Your Irons: A proper negative AOA creates more consistent contact, better trajectory control, and improved distance control. You’ll start hitting it “pin-high” more often and see better performance from various lies.
Practice Makes Permanent
The beauty of focusing on these setup fundamentals is that they require limited athletic ability, just attention to detail and consistent practice. Start by working on one parameter at a time at the practice range. Use alignment sticks or clubs on the ground to check your ball position and stance width. Practice your setup routine until these positions become second nature.
Remember, golf is a game of small margins. These seemingly minor setup adjustments can create major improvements in your ball striking and overall scoring. The next time you step up to the tee or approach an iron shot, take an extra moment to ensure your four setup parameters are optimized for the club in your hand.
The golf downswing represents one of sport’s most explosive movements, occurring in mere milliseconds yet determining the fate of every shot. For recreational golfers struggling with inconsistent ball-striking and limited distance, the solution lies in mastering two fundamental principles: establishing a stable lead side while generating power through an active trail side. The Foundation of…
The golf downswing represents one of sport’s most explosive movements, occurring in mere milliseconds yet determining the fate of every shot. For recreational golfers struggling with inconsistent ball-striking and limited distance, the solution lies in mastering two fundamental principles: establishing a stable lead side while generating power through an active trail side.
The downswing sequence begins with the lower body, creating a kinetic chain reaction that transfers energy through your upper body and into the clubhead. This weight transfer from your trail side to your lead side provides the stable foundation necessary for the upper body to unwind naturally, allowing golfers of modest physical stature to generate impressive clubhead speed.
The critical moment occurs in mid-downswing, when your lead leg firms up and stabilizes, creating a post around which your trail side can drive aggressively toward the target. When golfers cannot effectively shift their weight toward the target and clear their hips out of the way, the lower body becomes an obstacle that forces the arms and club to swing on an outside-to-inside path, producing the dreaded slice.
The photos accompanying this article demonstrate the fundamental differences between professional and amateur swing patterns:

Professional Swing Sequence:

Common Amateur Mistakes:
Bump the Stick: Place an alignment stick two inches to the right of your trail hip. Focus on shifting away from the target early in the takeaway, completing this movement by the time your club reaches parallel to the ground.
Step and Swing: Begin with feet together at address. As your backswing reaches halfway, step toward the target with your lead foot while completing the backswing. This creates the proper sequence and whip-like acceleration through impact.
Shift and Turn to Stick: Position an alignment stick opposite your lead heel five inches toward the target and five inches behind your lead heel. Practice shifting your lower body toward the target while rotating your hips to finish with your hips touching or near the stick.
Balance and Tempo: Sometimes working on your swing can disrupt your balance and tempo. A great number of downswing and follow through positions are rooted in the same cause: failure to utilize the lower body and trail side forcefully in the downswing. However, in doing so it is important to do this while maintaining good balance and tempo.
You Tube video link: Click here to see a video of how to add power and accuracy to your swing.
By incorporating these fundamental movement patterns – a stable lead side and an active trail side – into your swing, you’ll experience the satisfying combination of longer drives and more fairways hit. The source of most recreational golfers’ distance and accuracy problems lies in poor downswing mechanics, but with focused practice on these two key elements, you’ll develop more consistent, powerful ball-striking that will transform your game.
Every golfer, regardless of handicap, has at some point tried to “maintain lag” or “hold the angle” during their downswing. This coveted position—the angle formed between your lead arm and the clubshaft—is not just technical jargon. It’s the ideal swing mechanics behind generating explosive clubhead speed and those extra yards off the tee that we…
Every golfer, regardless of handicap, has at some point tried to “maintain lag” or “hold the angle” during their downswing. This coveted position—the angle formed between your lead arm and the clubshaft—is not just technical jargon. It’s the ideal swing mechanics behind generating explosive clubhead speed and those extra yards off the tee that we all crave.
What Really Causes Power Loss
Many recreational golfers mistakenly believe that extraordinary strength is needed to create and maintain this angle through the downswing. They tense up, trying to muscle the club—which ironically causes exactly what they’re trying to avoid: an early release.
Here’s the truth: Your distance problems likely aren’t due to lack of strength. Rather, it’s about:
The most common power leak? Losing your release angle too early, which not only reduces clubhead speed but brings the club to impact at an inefficient angle—compounding distance loss.
The Attainable Goal
Good news: You don’t need to match Sergio Garcia’s or Min Woo Lee’s dramatic lag positions to add significant distance. When your lead arm reaches parallel to the ground in the downswing, a 45-degree clubshaft angle is both ideal and achievable for most golfers with average strength and coordination.
At this crucial position in the swing, your release angle should be at its maximum. This is your power position.
Key Characteristics of an Effective Release Angle


Analysis of elite golfers reveals these fundamentals:
Common Amateur Mistakes

Backswing Errors:
Downswing Errors:
Practice Makes Power
Try these drills to groove your release angle:
Metronome Tempo Training: Set a metronome to 60 BPM (1 second) and complete your swing (takeaway to impact) within that beat. This promotes the rhythm that allows natural momentum to create proper lag.
Medicine Ball Wall Toss: From setup position, make a backswing motion while holding a 6-10 pound medicine ball, then toss it into a wall. Focus on using your back and shoulders to initiate the toss, creating a wide arc.
Wide-to-Narrow Drill: Start from a mid-backswing position with minimal wrist cock to feel a wide swing arc. As you continue to the top and begin shifting weight to your lead side, allow the clubhead to naturally narrow its arc by coming closer to your body.
Step and Swing: Begin with feet together at address. As your backswing reaches the halfway point, step toward the target with your lead foot while allowing your shoulders and club to complete the backswing. Feel the clubhead accelerate through impact like cracking a whip.
Weighted Club Training: Programs from speedsticks.com or thestacksystem.com offer comprehensive systems to build clubhead speed and increase distance.
You Tube video link: Click here to see a video of how to learn the proper release angle.
The Bottom Line
Remember: Proper mechanics create the ideal release angle naturally. It cannot be forced through effort or manipulation—it must be allowed to happen. Regular practice of these drills will integrate this power source into your swing, giving you those extra yards without sacrificing control.

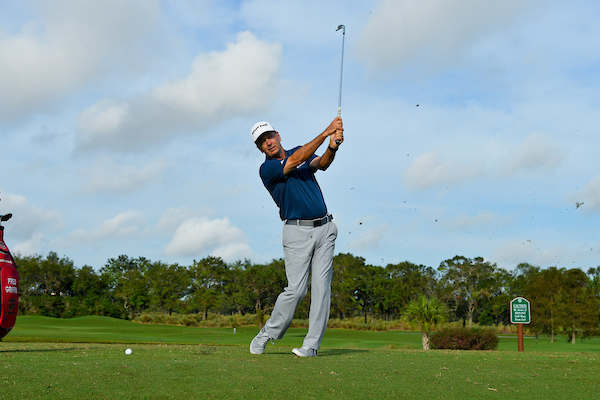
Although you cannot retrieve a shot once it leaves the clubface, the follow-through remains an extremely important part of the full golf swing. More than any other stage of the swing, it offers visual proof of what your body and club did before the ball was struck. Even though there are many idiosyncrasies that make…
Although you cannot retrieve a shot once it leaves the clubface, the follow-through remains an extremely important part of the full golf swing. More than any other stage of the swing, it offers visual proof of what your body and club did before the ball was struck.
Even though there are many idiosyncrasies that make PGA and LPGA players follow throughs their certain style, there are things they do in common that have a direct cause/effect relationship with the movements that transpired earlier in the swing.
The photos below reveal several key swing mechanics of a sound follow-through of PGA professionals:
Body Mechanics
Lower Body Dynamics
Upper Body Movement
Arms and Club Position
Arm Extension
Hand and Wrist Position
Photo of common follow-through problems of amateur golfers:
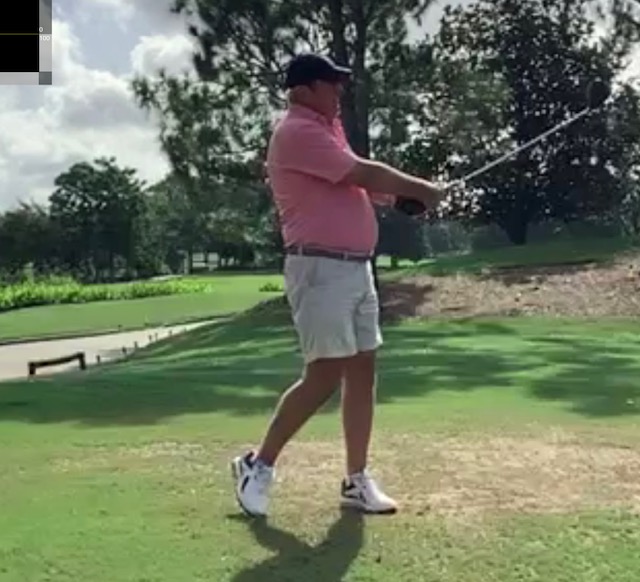
Typical Errors to Avoid
The majority of follow-through positions are a direct result of movement patterns developed earlier in the swing. By learning to engage the right side of your body correctly and allowing your arms to extend naturally, you’ll notice significant improvements in both power and accuracy across all your shots.
Reminder: Avoid consciously manipulating the swing. Instead, focus on developing smooth, natural mechanics that allow momentum to guide your movement.
In the golf swing, the impact position represents the critical moment where skill, technique, and power converge. Unlike the static setup, impact is a dynamic, high-speed position that separates exceptional ball strikers from average players. In the accompanying photographs—showing a face-on view and a down-the-target-line view—I compare three golfers at setup and impact: a model…
In the golf swing, the impact position represents the critical moment where skill, technique, and power converge. Unlike the static setup, impact is a dynamic, high-speed position that separates exceptional ball strikers from average players.
In the accompanying photographs—showing a face-on view and a down-the-target-line view—I compare three golfers at setup and impact: a model professional, a scratch amateur, and an eighteen-handicap amateur.
Face-on View Comparisons
Model pro vs Eighteen-Handicap Amateur
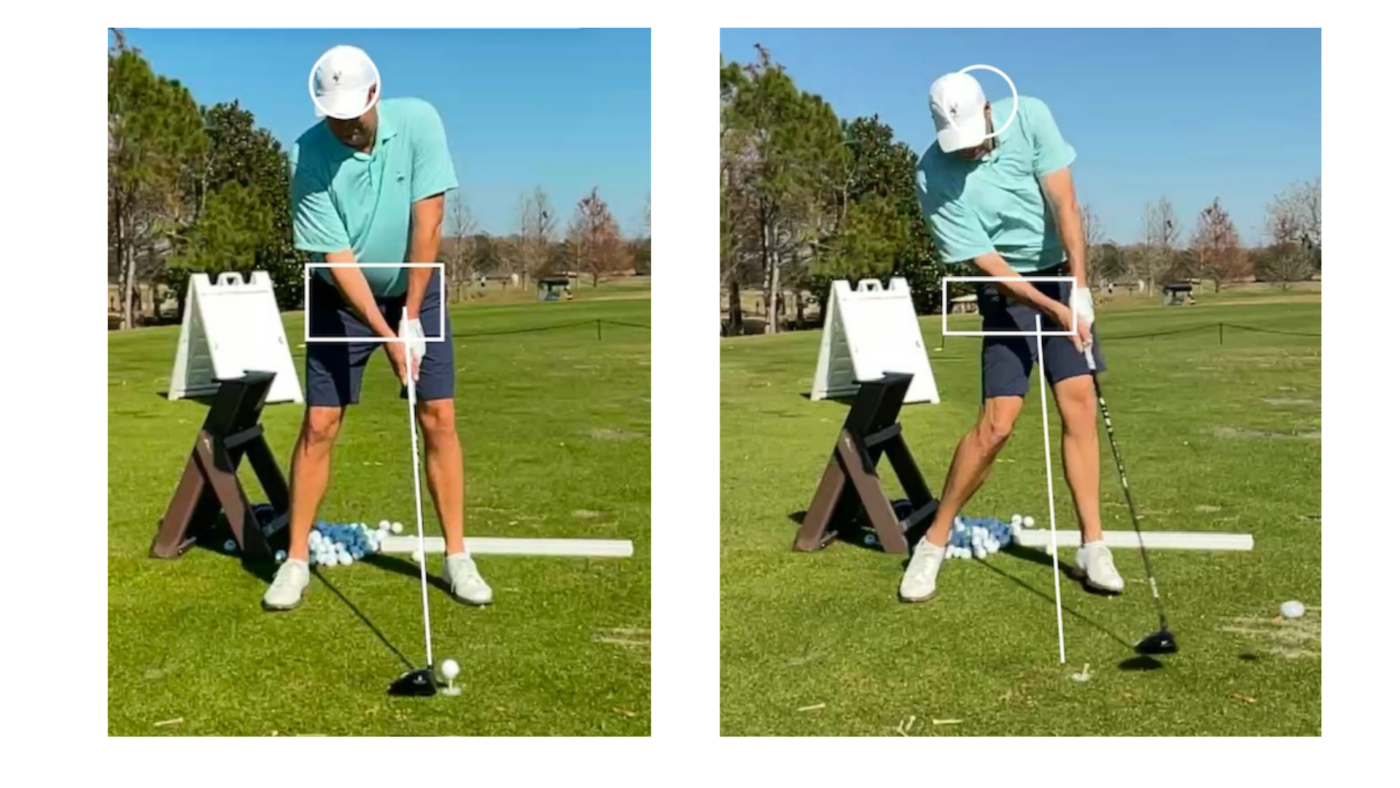
Elite Amateur
Face-on view demonstrates:
Eighteen-Handicap Amateur (Critical Flaws): Face-on View:
Down-the-Target-Line View Comparisons
Model pro vs Eighteen-Handicap Amateur
Elite Amateur
Eighteen-Handicap Amateur (Critical Flaws): Down-the-Target-Line View:
Remember, the perfect impact position is a byproduct of proper preparation and fluid movement. Master the preceding swing elements, and impact will take care of itself.

Every golfer wants more distance, and the key might be right under your feet. The vertical force in your golf swing—a dynamic up-down-up movement—can dramatically increase your clubhead speed and, consequently, your shot distance. The Jumping Principle Think of your golf swing like a vertical jump. Elite athletes and tour pros use a countermovement technique…
Every golfer wants more distance, and the key might be right under your feet. The vertical force in your golf swing—a dynamic up-down-up movement—can dramatically increase your clubhead speed and, consequently, your shot distance.
The Jumping Principle
Think of your golf swing like a vertical jump. Elite athletes and tour pros use a countermovement technique that primes the body for explosive power. This isn’t just about strength; it’s about timing, rhythm, and precise muscular engagement.
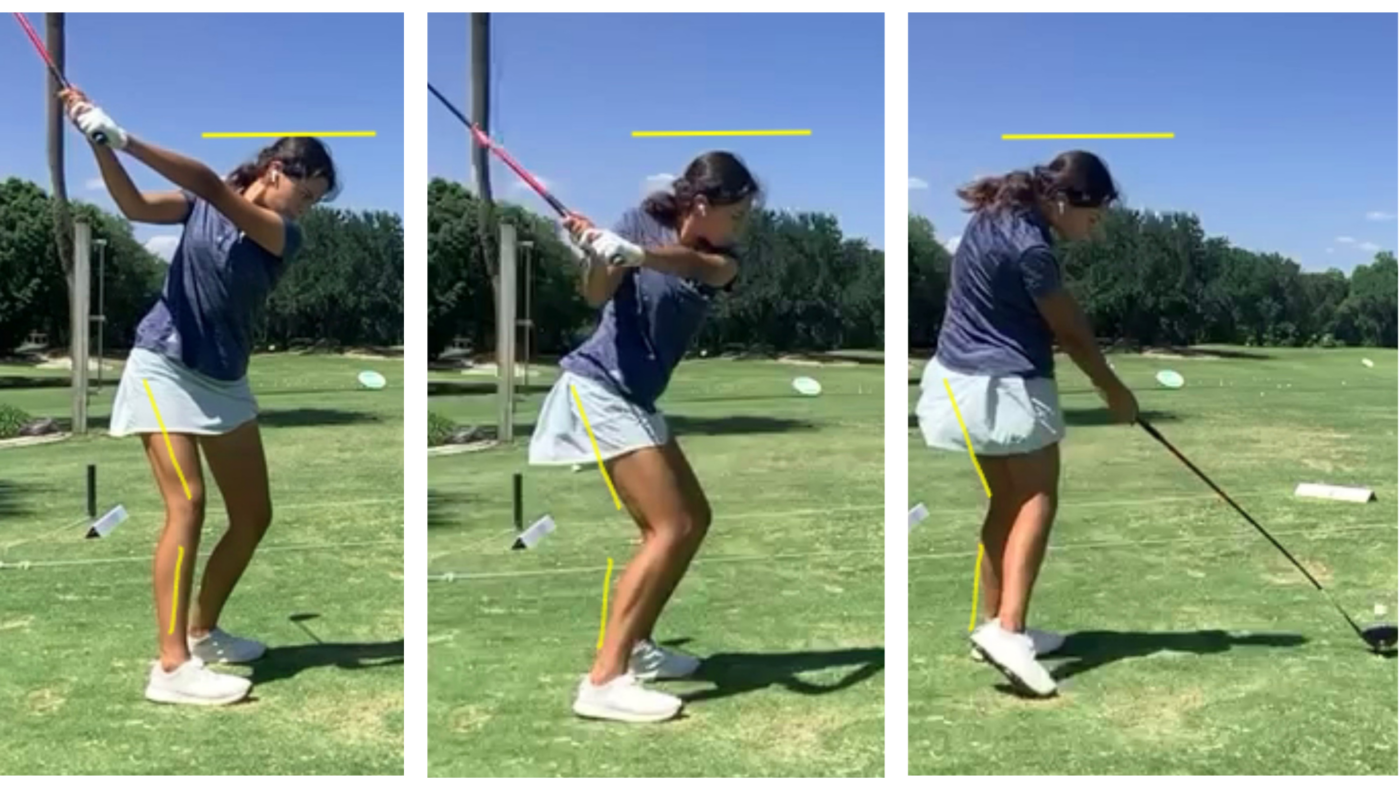
What Vertical Force Looks Like
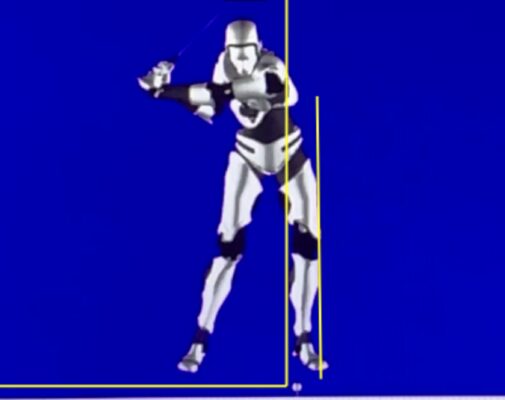
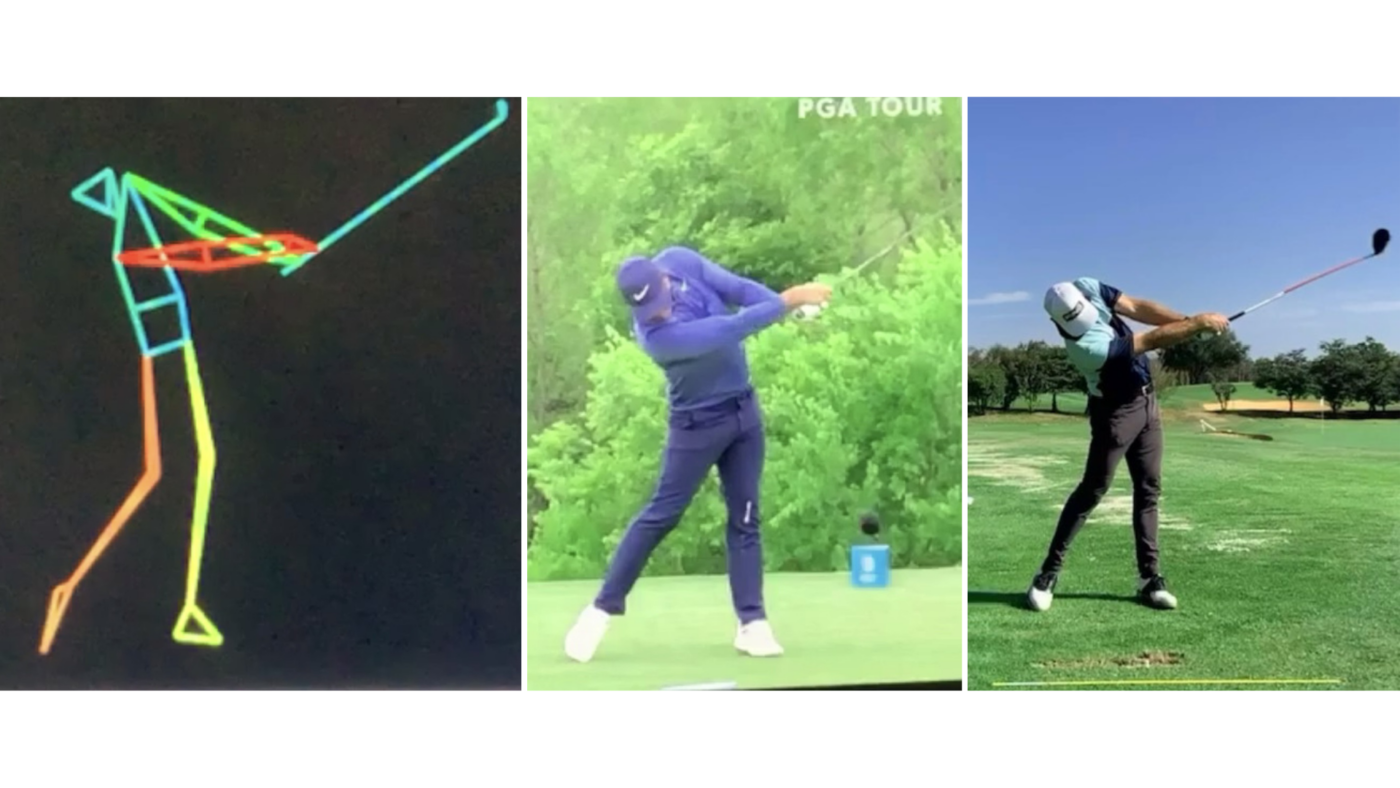
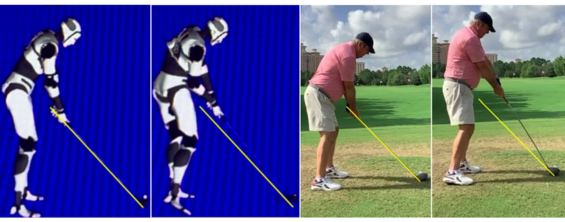
At the transition point of the swing (moving from backswing to downswing), top players exhibit a subtle but crucial downward movement. This isn’t a sway or lateral slide, but a controlled lowering of the body’s center of mass. Imagine preparing to jump—you first dip down (unweighting the body) slightly before explosively extending upward. The three images below show a stick figure model of best PGA Tour players, an elite college player and an average handicap golfer. I placed lines on the head and the trail leg to show how vertical movement is a result of good lower body (legs and hip) movement
Figure Comparison: Vertical Force in Action
Stick Figure Model: Illustrates classic vertical movement mechanics

Elite College Player: Demonstrates precise, powerful vertical force technique
Amateur Golfer: Shows limited lower body engagement
Pro vs. Amateur: The Vertical Movement Difference
How to Develop Vertical Force
Performance Benefit
Increasing vertical force isn’t just about power—it’s about efficiency. I use clubhead speed as an overall indicator of swing quality. In my experience, I have observed that as clubhead speed increases, shot accuracy often improves simultaneously.
Practice Tips
By understanding and implementing the vertical force principle, you’ll transform your golf swing from a mere arm-driven motion to a full-body, power-generating movement.
Remember: Distance isn’t about muscle—it’s about mechanics.
The start of the backswing is really a countermovement and involves two simple, whole-body movements. To begin the swing, you must shift your body laterally to the (right) trail leg, so you feel your weight transferring onto your trail leg and to the inside part of your trail foot. The movement is small but pronounced;…
The start of the backswing is really a countermovement and involves two simple, whole-body movements. To begin the swing, you must shift your body laterally to the (right) trail leg, so you feel your weight transferring onto your trail leg and to the inside part of your trail foot. The movement is small but pronounced; only about two inches. This happens early in the initial takeaway and is completed by the time the club is parallel to the ground. Although the initial part of the backswing is focused on getting weight transferred to the trail side, some turning of the hips and shoulders does occur.
This is why the initial shift must happen early, so you can then shift the emphasis on the second movement – the turning of the hips and shoulders. The timing of this shift then turn motion is subtle and it’s what gives the swing a fluid and effortless appearance. In the photos below, the professional golfer demonstrates the proper shift then turn movement pattern:
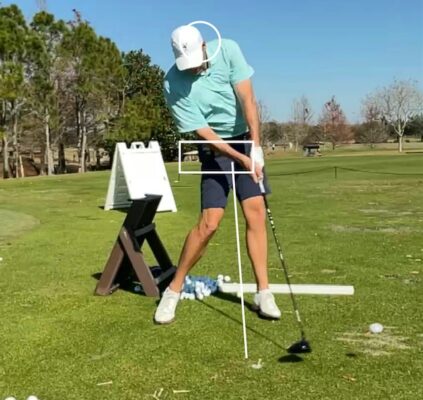
A very common fault among golfers is lingering over the ball in a static position and starting the swing with just the arms and no initial lateral shift. The student below demonstrates this improper no shift movement pattern:
The other common fault among golfers is to start the lateral shift at the wrong time. They fail to incorporate the initial shift and when it’s time to start the turning component of the swing they continue to shift laterally, this is what I define as a sway. The student below demonstrates this improper no shift and sway movement pattern:
If, after the club is parallel to the ground, there is additional lateral movement away from the target this would be a sway. That’s a critical point because when you continue to shift, your weight would drift so far to the trail leg that you couldn’t recover and shift back to the lead leg at the proper time.
REMEMBER: Once the club has reached a point parallel to the ground in the backswing it’s time to shift the emphasis to turning the body. This is where most golfers fail commonly and instead of turning, they continue to shift laterally.
Lack of a proper body shift and turn sequence decreases distance of your shots because you never get in a position to use the power of the whole body. A sign of poor use of the shift and turn backswing sequence is a tendency to place the ball too far back in the stance to make solid contact. Your ability to perform the initial weight shift to the right, very early, well before the club becomes parallel to the ground, and then implement the body turn is the most challenging aspect of the backswing, and the part that warrants the most attention and practice.
Click here to watch a video that demonstrates the shift turn sequence and the importance of starting the swing with some type of motion, so the initial shift is a natural athletic motion.

Developing a swing that produces a superb blend of distance and accuracy is what will ultimately result in a lower handicap. The longest and straightest golfers are PGA and LPGA tour players. They produce enormous distance and at the same time exhibit amazing precision with their shots. By improving your swing mechanics and making it…
Developing a swing that produces a superb blend of distance and accuracy is what will ultimately result in a lower handicap. The longest and straightest golfers are PGA and LPGA tour players. They produce enormous distance and at the same time exhibit amazing precision with their shots. By improving your swing mechanics and making it more efficient, you will enjoy the maximum distance you can achieve and hit the ball straighter as well.

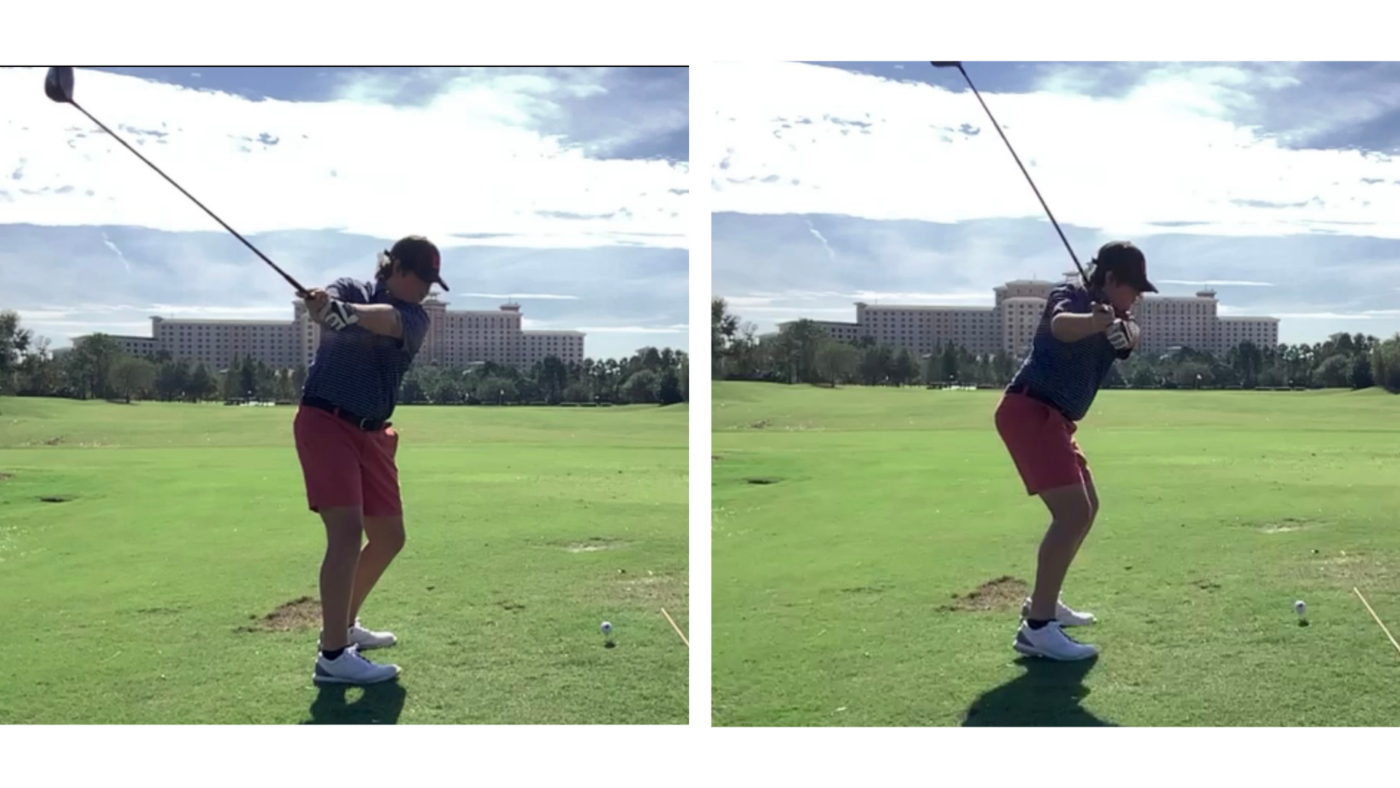
These photos of Brooks Koepka are in the mid-downswing position many times referred to as P-5. This is a point in the swing where the elite golfer has demonstrated maximum force on the lead leg and the maximum angle between the left arm and clubshaft (left photo). In addition, the right heel is raised off the ground and the hips are rotated open to the target while the shoulders remain closed with the clubshaft bisecting the trail bicep assuring an inside swing path (right photo).
One of the common faults I encounter in my teaching is what I label the Upper-Body Dive. The correct sequence in the downswing is to lead with the lower body by generating power from the ground through the legs and hips. The upper body remains relatively stable and coiled creating a stretch between the lower body and the upper body and arms. This stores energy in the swing resulting in greater clubhead speed. The consequences of an upper-body dive will force the club to release too early (photo below) on the downswing-losing both the power of the lower body as well as the speed of the club. It prevents you from moving your trail side down and through the shot correctly.
Looking at the swing from behind, or down the target line, the upper-body dive cost you accuracy as well. The limited use of the lower body shift and turn curbs your ability to channel the club into the ball along the proper swing path. The upper-body dive is one of the main causes of the “over the top” moves, which will result in a nasty pull or slice (photo below).

To see an instruction video on the Upper-Body Dive click here.
The two previous articles that will be helpful in avoiding the Upper-Body Dive are below:
A Blueprint for Longer Drives Off the Tee
Precision Perfected: Elevating Your Game Through Accurate Ball Striking

When I ask students to complete a pre-school questionnaire with their goals, the number one answer, hands down, is they would like to become more consistent with their ball striking. Most will say that they hit good shots from time to time, but they lack consistency. Their faulty swing mechanics are what is limiting their…
When I ask students to complete a pre-school questionnaire with their goals, the number one answer, hands down, is they would like to become more consistent with their ball striking. Most will say that they hit good shots from time to time, but they lack consistency. Their faulty swing mechanics are what is limiting their consistency, and this starts with compensating factors that are built into their set-up position. For example, a chronic slicer will align to the left of the target and strengthen the grip or close the clubface to reduce the slice. A golfer that casts or releases the club early will place the ball back in their stance to gain better contact, avoiding fat or thin shots.
The ability to position the body correctly at address serves several vital objectives that are at least as important as the swing itself. The quality of every movement in the swing is a byproduct of your set-up at address. Proper set-up creates the foundation for a consistent swing path, solid contact, and ultimately, better scores on the course. By focusing on your set-up, you can eliminate many compensations and bad habits that lead to inconsistent ball striking. This article will guide you through the essential aspects of setting up correctly and provide drills to help ingrain these fundamentals into your routine.


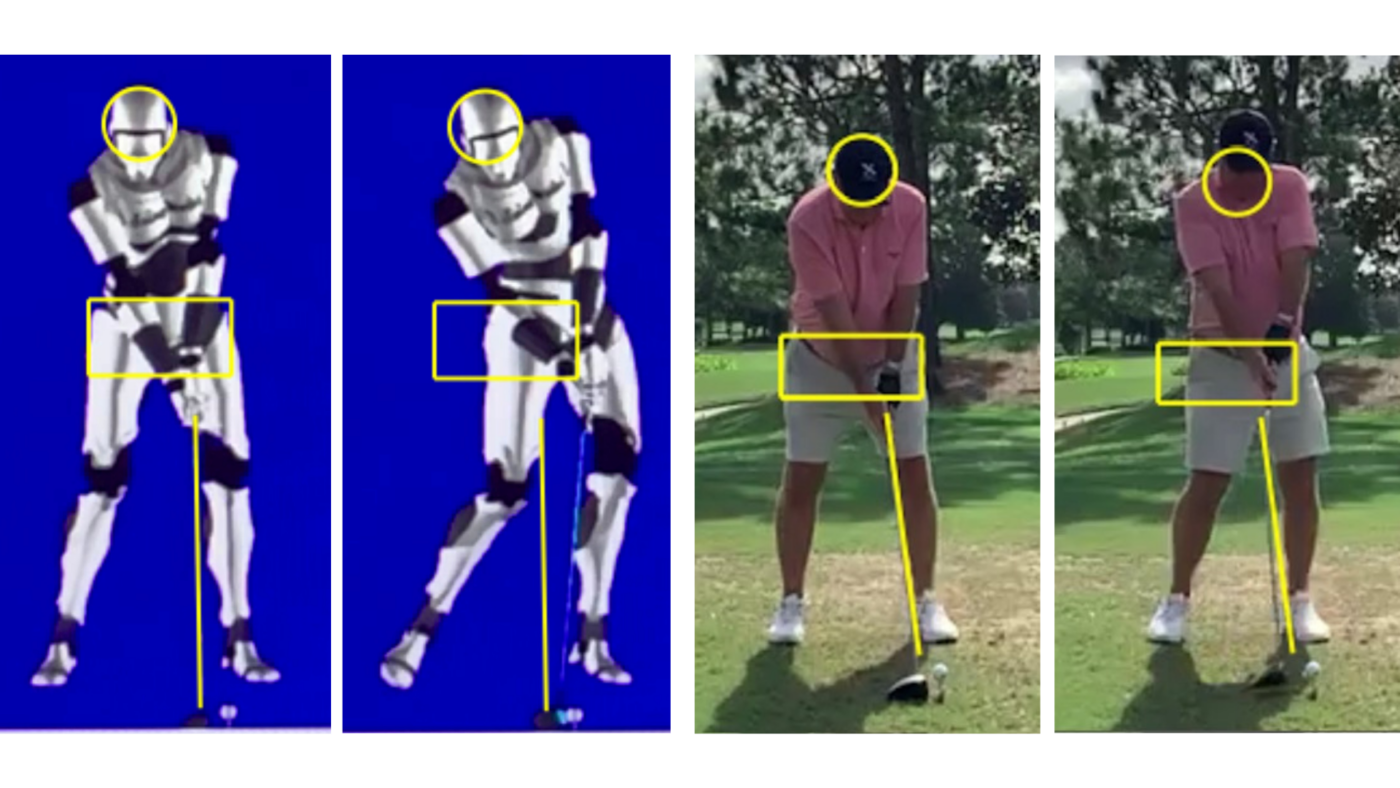
Whether viewed from down-the-target-line (left) or face-on (right), a good set up allows the golfer to look as if every shot will be powerful and straight.
Once the swing begins, your whole attention is focused on the task of striking the ball, and your body will do whatever is necessary to make it happen. Where you decide to place the ball on the ground in relation to your feet has an enormous influence on how your body reacts in your attempt to find the ball with the clubhead. If the ball is positioned correctly, you can swing the club freely without having to make compensations with your body.
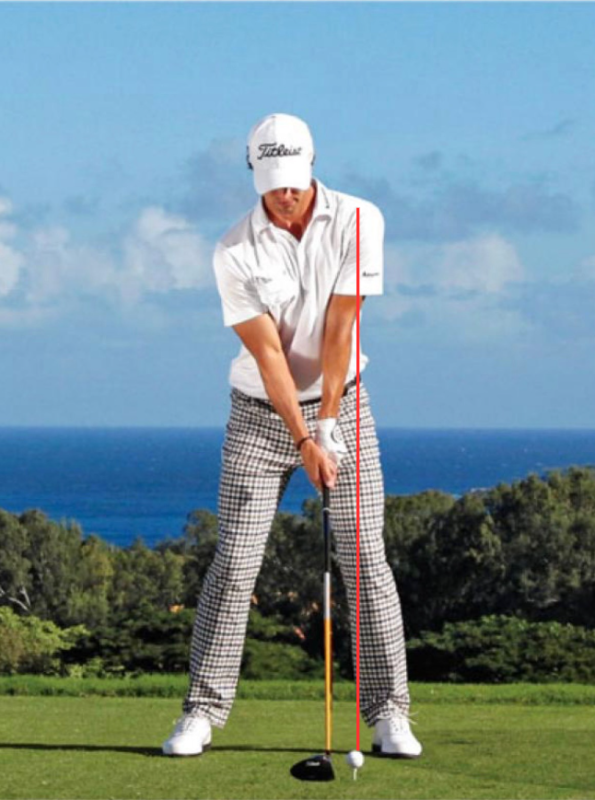
With the driver the ball is positioned opposite the left heel (notice the ball lines up with the left shoulder) and the ball moves back slightly as you progress to your irons. However, the ball position for the 9-iron is only moved three inches back from the driver position and the stance is narrowed.
The main issue from this view of the swing is golfers place the ball too far back in their stance at address. When the ball is positioned too far back in the stance, you can’t use the lower body effectively during the downswing. Placing the ball too far back in the stance necessitates a weak, arms only swing that lacks power. By training the correct ball position, your lower body will start contributing more to the swing and your ball contact and power will improve.

The proper distance away from the ball (toe-to-ball distance) is dictated mostly by the length of the club. This helps the golfer to establish the proper swing path during the swing. The range will vary slightly due to club length, swing style and body type but a general guide is the driver is 34-36 inches, the 5-iron is 22-24 inches and the 9 iron is 19-21 inches. Making it a point to stand the proper distance from the ball will allow the club to perform in the way it was designed.

The feet are aligned parallel to slightly open relative to the target line. The left foot is turned out, toward the target, the right foot is positioned straighter and slightly forward of the left foot. Since the power of the swing comes from the big muscles, this alignment and foot position allows more contribution from the lower body. The better players have realized that, to apply maximum power, there must be emphasis on downswing shift and rotation.
In my experience teaching thousands of golfers, the same set up mistakes tend to occur repeatedly. A common one that is many times done on purpose is a closed stance alignment. It is usually prescribed as a slice cure, a counter to the outside-to-inside swing path that causes a slice. But aiming way to the right is a band aid cure and it creates more problems than it solves. Aiming to the right causes your backswing path to be dramatically more inside. My experience has been that the farther you swing inside on the backswing, the farther outside the you will swing in the downswing. This will be worsening your tendency to swing outside-to-inside. The closed stance limits the forward movement as well as the rotation of the lower body during the downswing. To compensate for this restriction, the upper body is normally used to bring the club around the body. Due to the decrement in swing quality and the restrictions placed on the lower body the resulting clubhead speed will also be lowered.

Other components to consider at set up include:
The right knee is angled inside the right ankle so it can control the natural tendency for the knee to move away from the target during the backswing.
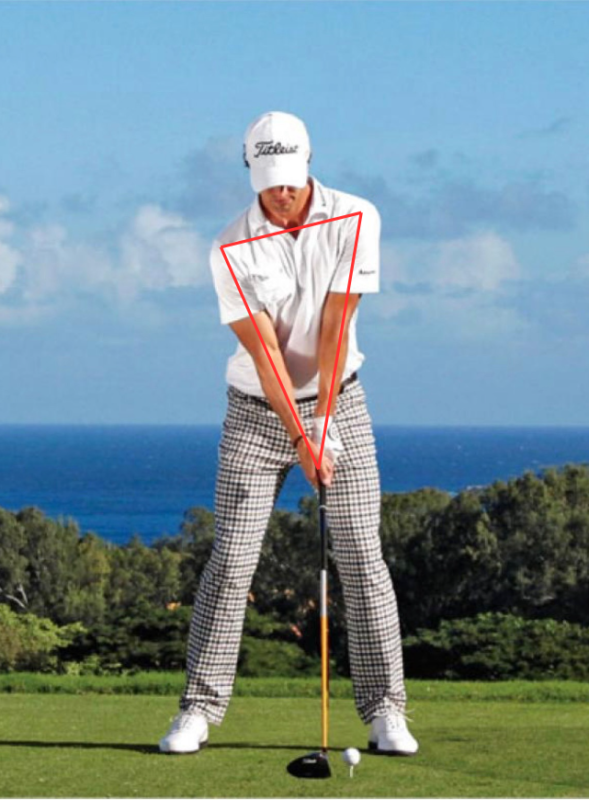
The shoulders are tilted, or inclined, so the right shoulder is below the left shoulder. This allows for the proper placement of the right arm to reach across your body and join the left so that both hands, the club and the ball are opposite your left heel at address. A triangle is formed with the arms, and they merge together at a point just inside the center of the left leg. By placing the hands forward at set up, it becomes easier to return them to a forward position at impact.
The right elbow is slightly flexed, while maintaining the left arm in a virtually straight position. This allows the left arm to be visible above the left.
The weight is positioned slightly towards the balls of the feet and distributed evenly between the two feet. This is the type of posture and balance you want to produce when executing a good set up for golf. A good checkpoint is the center of your hip should be positioned over your ankle joints.

In my January post, I talked about one of the crucial components that enhance accuracy. In this post, I will expound on another critical aspect of the swing that will help you find more fairways and greens. I mentioned how important it is to swing on the correct path (inside – square – inside) relative to…
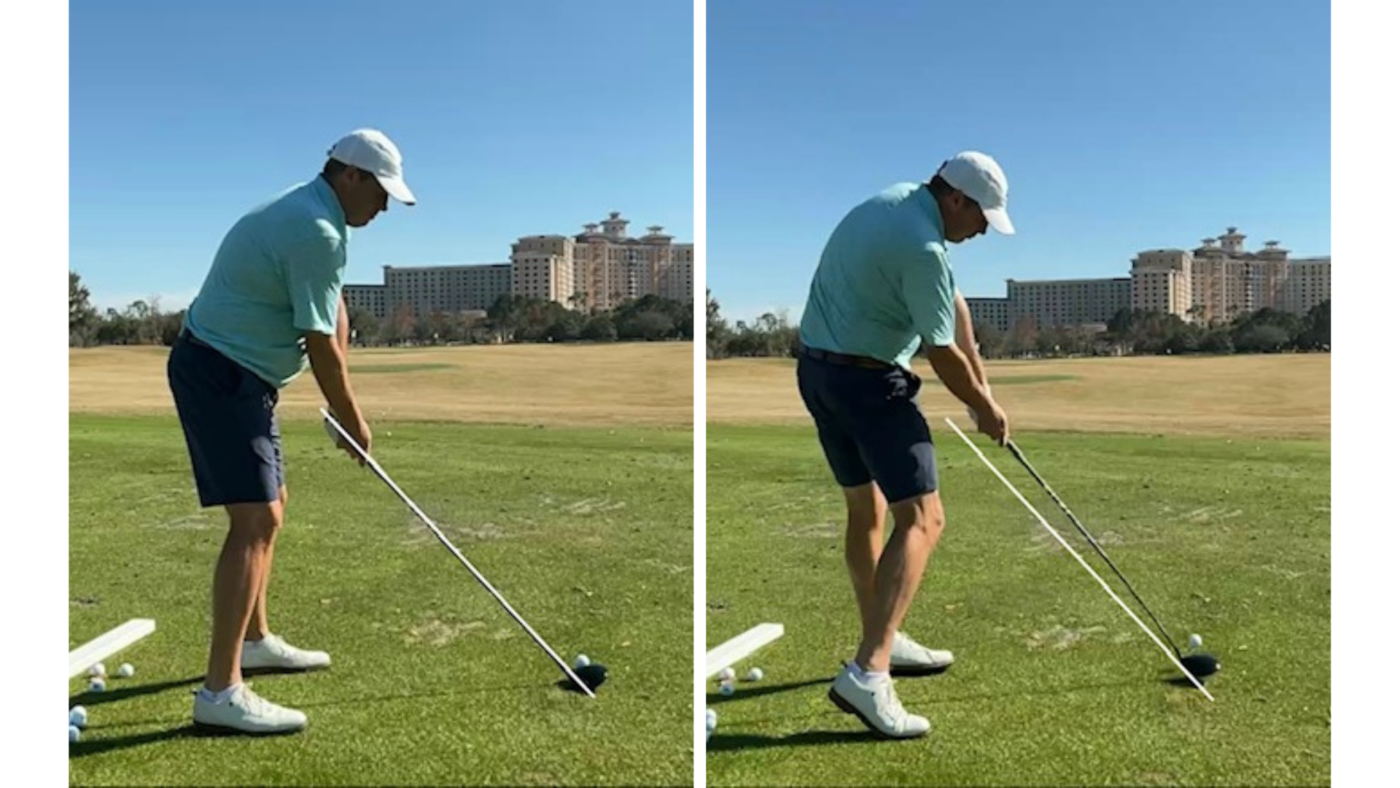
In my January post, I talked about one of the crucial components that enhance accuracy. In this post, I will expound on another critical aspect of the swing that will help you find more fairways and greens.
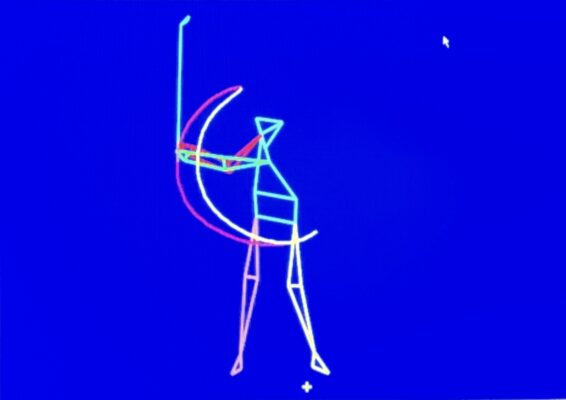
I mentioned how important it is to swing on the correct path (inside – square – inside) relative to the target line, but another factor is controlling the proper “pitch” of the club. Pitch simply refers to the tilt of the club during the swing. During the move to the top, the pitch of the club is more toward vertical. In comparison, the pitch of the club is flatter on the downswing. The images below are Brooks Koepka with a driver and in his mid-backswing shaft “pitched” vertical and mid-downswing (top images) where the shaft is “pitched” flatter. In the (bottom images) I have added a line to reference the “pitch of the shaft related to the position of the ball. The image in the mid-backswing the line is pointed inside the ball and in the mid-downswing the line pointed just above, or outside the ball.
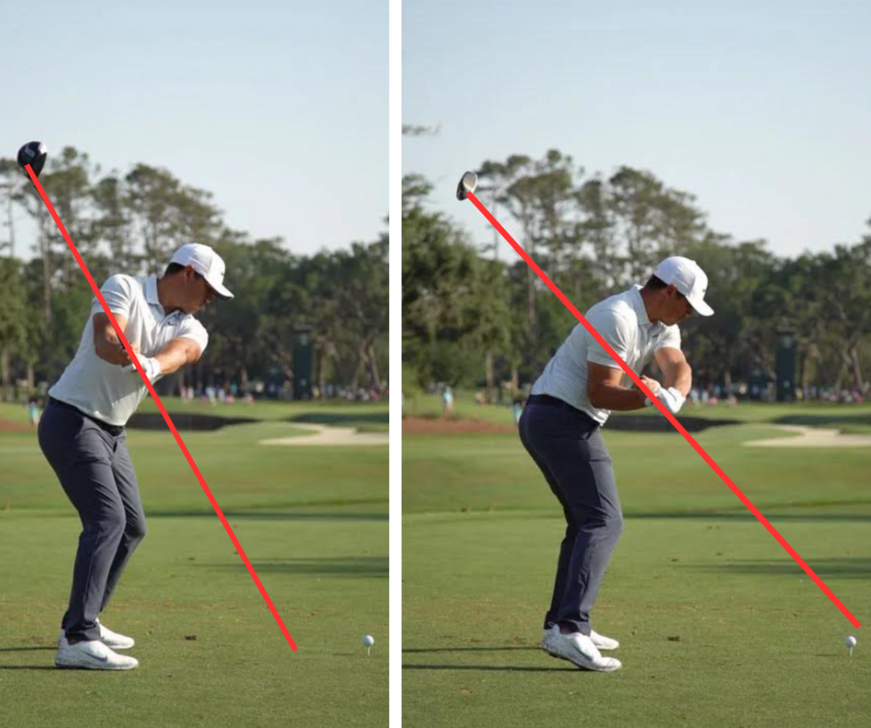
Brooks does so many good movements that contribute to his great ball striking ability and controlling the “pitch” of the club is one of his many attributes of his great swing.
This change in “pitch” of the club from the backswing to the downswing has been called many things in golf, from “flattening the shaft” to “shallowing the club.” Regardless of the choice of terms, it is a major contributor to a successful golf swing. This club movement begins as you arrive at the top of the backswing and continues early in the downswing. As with most critical movements in the golf swing “time matters” and the time when this club movement occurs is very important.
It ensures that the club will complete its journey to impact efficiently, automatically producing an inside path as well as helping to square the clubface.
To integrate the correct movement pattern and “pitch” of the club click on the link below to watch a demonstration of suggested drills you can work on at home or on the range.

The Masters is the one golf event where I park myself in front of the television and watch the broadcast for five hours on Sunday afternoon. I started my professional career in Augusta as an assistant pro at West Lake Country Club. I have been fortunate to play Augusta National Golf Club on a couple…
The Masters is the one golf event where I park myself in front of the television and watch the broadcast for five hours on Sunday afternoon. I started my professional career in Augusta as an assistant pro at West Lake Country Club. I have been fortunate to play Augusta National Golf Club on a couple of occasions. In 2001, while working with Franklin Langham, I played with him a couple of weeks before the Masters and then joined him at the tournament where he finished T40.
Scottie Scheffler’s win was very impressive and especially given the windy conditions earlier in the week. In his press conference after the event, he contributed his win to his excellent driving and stroke saving short game. Driving distance is a big advantage at Augusta and combine that with an impeccable short game and you are almost certain to find yourself in contention.
While previous posts focused on improving driving and approach play, the short game deserves equal attention. If you have been following my tips, you’re probably familiar with the concept of Tiger 15 – a drill I incorporate into every lesson with my students. It’s a simple yet incredibly effective exercise that can drastically improve your short game skills. There is a video on You Tube of Tiger rolling a ball out in front of him approximately 15 yards and his first shot he lands the ball on top of the ball that’s 15 yards away. Now it’s your turn to give the Tiger 15 a try!

Contrary to the full swing’s power-driven nature, the short game hinges on power control. A proficient short game can salvage a round, turning a bad day into an okay one or a good round into a great one. It’s a myth that only pros excel here – with proper technique and practice, anyone can handle a wedge just as effectively.
The pros are good at the short game and one of the reasons is that they keep it simple. Based on years of research with Dr. Ralph Mann and myself we identified three factors to consider in the short game: solid contact, desired trajectory, and optimal distance.
Once you have decided on the shot and the swing begins, the main goal of the short game shot is to strike the ball cleanly. To insure this, place the ball in the middle of the stance, align the stance slightly open to the target, shift the weight slightly forward and place the hands in front of the ball at address. Not only does this help to get the hands in front of the ball at impact, but the open stance also automatically produces a more vertical or upright swing path. To further help increase the steepness of the swing, limit any shift away from the target during the backswing. Then make a whole-body transition, moving both the lower and upper body forward during the downswing. Unlike the full swing, both the upper and lower body are ahead of the set-up position when impact occurs. Besides the differences in setup and lack of body movement off the ball, the short game has many traits of the full swing. The short game involved the total body, with both hip and shoulder turn.
In the effort to keep the short game simple and repeatable, use the same swing mechanics and learn to alter the length, clubhead speed and club selection for trajectory and distance control. For example, on a 15-yard shot grip down a couple inches and narrow the stance, your swing length (arms) will be waist high (backswing) to waist high (follow through) with a slight wrist hinge. The clubhead speed is approximately 35 MPH. Use a more lofted club to a tight pin, and as the pin location is in the middle or back of the green choose a different loft and keep the swing the same. When the shot increases to 50 yards, grip the club in the normal position and move the feet wider, the swing length (arms) will be chest high (backswing) to chest high (follow through) and a bit more wrist hinge. The clubhead speed increases to 50 MPH.
The better players succeed in their short game shots because they make it simple. First, they account for most of the variation in the shots (distance and trajectory) before the swing begins by choosing the right club and grip length. Second, they set up to the ball to produce a steep vertical swing path, with the hands in front of the ball at impact. Finally, they keep the swing mechanics the same for all shots, varying only the length and speed of the swing to control distance.
The conditions that are encountered in the short game shots vary greatly. The situation that demands the greatest change in mechanics is the type of lie. If the lie is good, then no alterations are necessary. If the lie is poor, regardless of the reason, then the shot becomes more difficult. The best solution is to increase the steepness of the clubhead path to avoid the obstacle between the ball and the club (high grass, dirt, sand, etc.). One way to accomplish this would be to alter the swing to swing the club more dramatically up and down. Since this is too complex and dangerous, the better players choose a simpler method. They simply move the ball back in the stance and make the same swing they would use for a normal shot. The ball position guarantees a steeper angle and avoids the player from having to make complex swing changes. The short game has been made complicated by so many different opinions concluding that there are an infinite number of ways execute a good short game. In fact, the short game is based on simplicity. The simplicity is in keeping the swing mechanics the same and just deciding on swing length and club loft. Simple as that!