Every golfer dreams of hitting longer drives and more consistent iron shots. The secret isn’t always about swinging harder, it’s about understanding and optimizing one of golf’s most crucial yet overlooked fundamentals: your Angle of Attack (AOA). This single measurement can transform your game, and the best part. It all starts before you even take the club back.
What Exactly Is Angle of Attack?
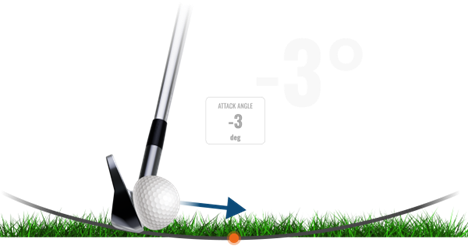
Angle of Attack is the vertical path of your clubhead relative to the ground at impact. Think of it as the steepness or shallowness of your swing’s bottom arc. This measurement plays a crucial role in determining your launch angle, spin rate, trajectory, and overall distance.
A negative angle of attack means your clubhead is moving downward into the ball, creating a steeper impact that generally results in lower launch with increased backspin. This is ideal for irons and wedges, where you want crisp, penetrating ball flight and maximum control.
In contrast, a positive angle of attack means your clubhead is moving upward through impact—creating a shallower, sweeping motion that promotes higher launch with lower spin. This is particularly beneficial for your driver, where reducing spin and increasing launch angle can add significant yardage to your tee shots.
The Four Setup Parameters That Change Everything
The side-by-side images below illustrate the setup differences that create optimal Angle of Attack for each club. Notice how the PGA Model Pro’s driver setup (left) contrasts sharply with his 9-iron position (right)from ball position and stance width to shaft angle and weight distribution, every element works together to predetermine the ideal swing path. The yellow line is the clubhead’s path during the downswing and the dark line is the path of the follow-through. This demonstrates the shallower driver path compared to the steeper nine iron path. The vertical orange line is the position of the ball relative to the body.

Achieving optimal AOA numbers isn’t about complex swing thoughts during your swing. It’s about establishing the right foundation from the start. Once you begin your swing, instinct takes over—your body will do whatever is necessary to make contact with the ball. That’s precisely why the setup is so critical. These four parameters essentially program your swing path before you even move the club.
1. Ball Position: The Foundation of Your Attack Angle
Driver Setup: Position the ball opposite your lead heel. This forward ball position naturally encourages an upward strike, helping you catch the ball on the ascending part of your swing arc for maximum distance and optimal launch conditions.
Iron Setup (9-iron example): Move the ball back just three inches from your driver position—not dramatically back as many golfers assume. This slight adjustment helps create the downward strike needed for crisp iron contact while maintaining a balanced setup.
The key insight here is subtlety. Many amateur golfers make dramatic ball position changes that throw off their entire setup. The three-inch rule keeps you in the optimal impact zone while allowing for the necessary AOA adjustments.
2. Stance Width: Creating the Right Foundation
Your stance width directly influences your ability to create the proper AOA for each club. The principle is simple: wider for drivers, progressively narrower for irons.
Driver Stance: Slightly wider than shoulder-width apart. This wide base provides stability for the powerful rotation needed in your driver swing and naturally promotes the upward strike you’re seeking.
Iron Stance (9-iron example): Slightly narrower than shoulder-width. This narrower stance makes it easier to shift your weight forward through impact, promoting the downward strike that produces solid iron contact.
Remember to adjust based on your body type. Broader-shouldered golfers will naturally adopt wider stances, while more compact players will use relatively narrower positions.
3. Shaft Angle: The Subtle Game-Changer
The angle of your club shaft at address might seem like a minor detail, but it has a major impact on your AOA.
Driver Shaft Angle: Tilt the shaft very slightly away from the target, positioning your hands just behind the ball. This setup promotes the upward strike that maximizes driver distance and reduces the dreaded pop-up.
Iron Shaft Angle (9-iron example): Tilt the shaft slightly toward the target, positioning your hands just ahead of the ball. This forward shaft lean helps create the descending blow that produces crisp iron contact and optimal trajectory.
These shaft angle adjustments work in harmony with your ball position to create the ideal impact conditions for each club.
4. Weight Distribution: The Dynamic Element
How you distribute your weight at address sets the stage for proper weight transfer and optimal AOA throughout your swing.
Driver Weight Distribution: Balance your weight evenly between both feet. This neutral position allows for the full body rotation and weight transfer that creates power while maintaining the upward strike angle.
Iron Weight Distribution (9-iron example): Shift slightly more weight to your lead foot (about 60-40 distribution). This forward weight bias makes it easier to maintain the descending strike through impact while still allowing for proper weight transfer.
Understanding the Swing Path Visualization
When you observe high-level players, you’ll notice distinct differences in their swing paths between drivers and irons. The clubhead path with a driver appears much shallower through the impact zone. With irons, the path is noticeably steeper, creating that “ball-first, turf-second” contact that produces consistent distance and trajectory control. The ball position relative to your body acts as the timing mechanism for these different attack angles. With the driver, the forward ball position means you’re catching the ball as your swing arc begins to ascend. With irons, the ball moves slightly back, catching the ball just before the bottom of your swing arc, creating the downward strike.
Click here to view a YouTube video demonstrating the 4 Keys for optimizing AOA
Cause and Effect: Why Setup Determines Success
In golf, understanding cause and effect relationships is crucial for improvement. Your setup positions create a chain reaction that influences every aspect of your swing. When you establish the proper ball position, stance width, shaft angle, and weight distribution for each club, you’re essentially programming your swing for success before it even begins.
Many golfers struggle because they try to manufacture different attack angles through swing manipulation during the motion. This approach is inconsistent and often leads to timing issues. By contrast, when your setup naturally promotes the correct AOA, your swing becomes more intuitive and repeatable.
The Distance and Consistency Connection
Optimizing your Angle of Attack through these four setup parameters offers multiple benefits:
With Your Driver: A positive AOA can add 10-20 yards to your drives by reducing spin and increasing launch angle. You’ll also see more consistent ball striking and fewer mishits.
With Your Irons: A proper negative AOA creates more consistent contact, better trajectory control, and improved distance control. You’ll start hitting it “pin-high” more often and see better performance from various lies.
Practice Makes Permanent
The beauty of focusing on these setup fundamentals is that they require limited athletic ability, just attention to detail and consistent practice. Start by working on one parameter at a time at the practice range. Use alignment sticks or clubs on the ground to check your ball position and stance width. Practice your setup routine until these positions become second nature.
Remember, golf is a game of small margins. These seemingly minor setup adjustments can create major improvements in your ball striking and overall scoring. The next time you step up to the tee or approach an iron shot, take an extra moment to ensure your four setup parameters are optimized for the club in your hand.